Prepare Chemical Substances
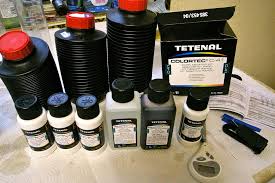
1. Buy a photographic development kit. There are some development kits that can be used to develop C-41 in color and black and white. The C-41 is a common consumption film used in 35mm machines, so these development kits are the most practical solution for the average consumer.
· Note, however, that if you are not using C-41 compatible film, you should look for a specific kit for your film type. Instructions for different development kits and used chemicals may differ from those contained herein.
2. Shakes powder for hot water development. Pour 1600 ml of hot water into a clean glass or plastic container. Mix the developing powder until it dissolves. Add enough water to get to 2 liters.
· The water temperature should be about 43.5 � C. Since it is cooled for use, it should not fall below 37.8 � C.
· Use distilled water rather than tap water whenever possible.
· Do not mix chemicals in metal containers.
3. Mix blix packages with water. Pour another 1600 ml of hot water into a second clean glass or plastic container. Mix the “blix” or “bleach-fix” into the water and add enough water to 2000 ml.
· The blix is also known as “bleach-fix”. [1] If there are more blix packages, add them in alphabetical order: “A” and then “B”.
· The water temperature should be about 43.5 � C. It will cool down while remaining in position, but you should not allow it to drop below 37.8 � C.
· Use distilled water and do not mix chemicals in metal containers.
4. Shakes the stabilizer pack with water. Shakes the contents of the powder that makes “stabilizer” in 2 liters of fresh water and mixes it carefully.
· Use distilled water at room temperature. There is no need for a precise temperature.
Prepare the Tank
1. Wash your tank with hot water. Separate the roll in its various parts: the body, the center column, the spiral, the lid and the hood. Wash the body with warm water and dry thoroughly with a clean cloth.
· If there are chemical stains, smudge with hot water and a clean cloth.
· Reposition the central column when you’re done. The column is what makes it possible for the tank to remain dark or “light-proof” even when adding chemicals.
2. Adjust the spiral to accommodate the film. [2] The standard size setting should be fine for the 35mm film, but if so, you cannot change the size until it is compatible with the film.
· Separate the spiral into two separate pieces. A piece has a long channel while the other has a tongue that engages in this channel at various points.
· The first engagement should be for the 35 mm film. The second is usually for 127 and the last for 120. Attach the tab in the first channel, making it snap in place.
Load the Film
1. Turn off the lights. Holding the spiral, turn off the lights of the room you are in. Give your eyes time to adjust to darkness before continuing.
· Exposing the film to light will ruin it, so you have to keep the lights off while loading the film in the tank.
2. Remove the film from the roll. Use a bottle opener to open the roller, imagine that the bottom of the roll is the cap.
· After removing the film, always handle the edges instead of the center.
· Cut away the guide portion at the beginning of the film with clean scissors and set aside.
3. Load the film on the spiral. Load the end of the film so cut into the guides inside the spiral. Make sure the first 3-5 cm film is inserted into the spiral.
· Turn the coil back and forth to insert the rest of the film. The rolls below the guides will take on the film and pull it in. Continue until the film is completely wound on the spiral.
· Cut the last portion of film attached to the roll.
4. Place the coil in the center column of the tank. Insert the spiral into the center column and firmly screw the cover.
· Once done, you can turn on the lights again. The central column should provide adequate protection against light.
Develop the Film
1. Pre-wet the film. [3] Pour pure distilled water into the tank and leave to stand for 60 seconds before emptying it.
· The water coming out will probably be turbid green.
· The water temperature should be about 38.9 � C.
2. Develop the film. Pour the growth solution into the tank and leave for 3 minutes and half before emptying it. The film should be completely submerged, and you should shake the tank for 10 seconds every 30 seconds during this phase.
· Make sure the development solution has a temperature of about 38.9 � C.
3. Use the blix. Pour the blix solution into the tank and leave for 6 minutes and half. Shake the tank for 10 seconds every 30 seconds. Get it out when you’re done.
· The temperature of the blix should fluctuate between 35 and 40.6 � C.
· The stage of light-sensitive development ends with the end of this phase. You can work without lid as soon as you finish.
4. Wash the film. Remove the spiral from the tank and wash under running water for 3 minutes to wash off the chemicals.
· The water temperature should fluctuate between 35 and 40.6 � C.
5. Use the stabilizer. Reposition the spiral in the tank. Pour the stabilizer and shake the tank for 15 seconds. Leave the film in the stabilizer for a time between 30 and 60 seconds.
· The solution should be at room temperature.
6. Dry the film. The film should develop for a time between 4 and 8 hours.
· Remove the spiral from the tank again and separate it to open it.
· Pinch one end of the roll and remove the film, leaving it unrolled.
· Apply the film in a dry, dust-free place, like a shower cubicle. Use clips for film.
Thanks Plano Foundation Repair for supporting our site!